7.04.01.1
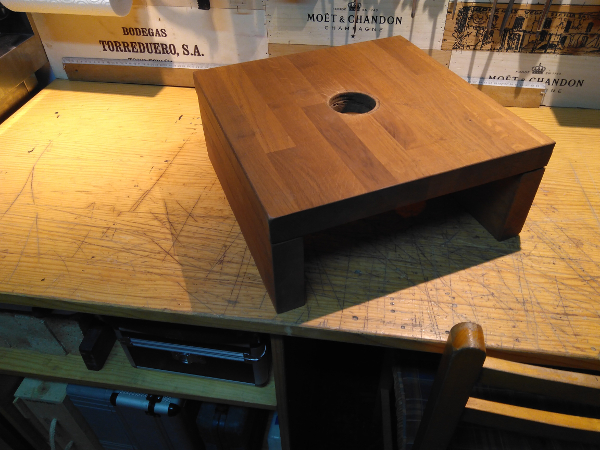 DETALLE 1: Peana para ganar altura y acceder al reset.
-Como me quedaba un poco baja la Grainfather respecto al
fregadero donde la conecto, he hecho una peana de madera (con unos restos de una
cocina de IKEA) para subirla unos centímetros.
-Estuve pensando ponerle ruedas, pero no veo la necesidad de dasplazarla, y
considero que es más seguro así.
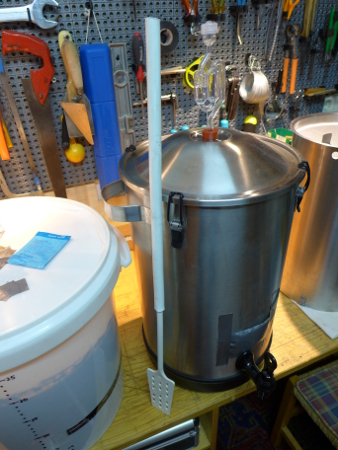
DETAIL 1: Base to gain height and access the reset.
-As I had a little low Grainfather regarding the sink where I connect, I made a
wooden base (with a leftover remains of a kitchen) to raise it a few
centimeters.
-I was thinking about putting wheels on it, but I do not see the need to move
it, and I think it's safer that way.
|
7.04.01.2
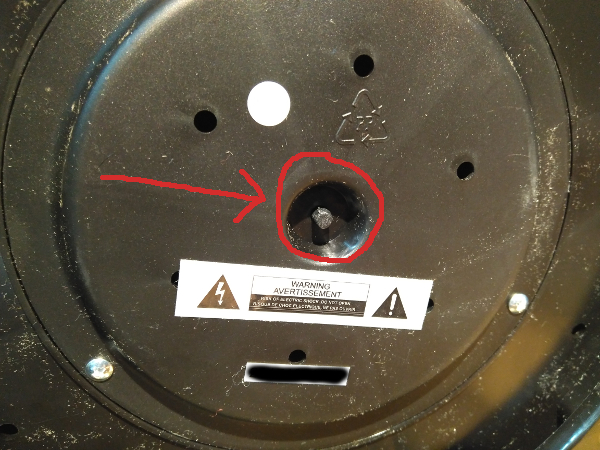
-Además, le he
taladrado un agüjero central de manera que si alguna vez saltase el protector de
nivel bajo de agua/sobrecalentamiento, se pudiese llegar fácilmente al botón de reset, que, la verdad, no está en un sitio muy cómodo.
Me avisó Branchi...
-In addition, I have drilled a central hole in it so that if
the low water level / overheating protector ever leaps out, the reset button
could easily be reached, which, in truth, is not in a very comfortable place.
(Volver arriba) |
7.04.02.1
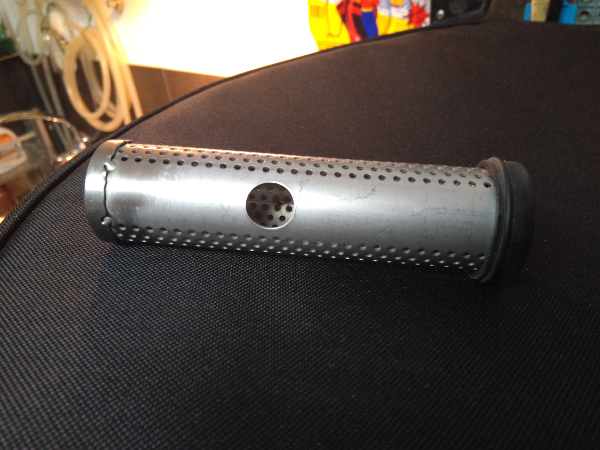
 DETALLE 2: Filtro de emergencia.
-Al inicio de la limpieza de la primera elaboración se observa
que la tapa circular negra de goma que cierra el filtro (necesaria para acceder
a su interior y limpiarlo bien) se había separado del filtro... Debió suceder
justo al final del hervido (ver punto 7.03.42), un accidente que sería bastante
delicado de manejar si sucede a mitad de la cocción, ya que la bomba se para
seguro, hay que vaciar el mosto hirviendo, limpiar filtro y llave roja de
bola,... ¡más vale no pensarlo!
-Para evitar las desastrosas consecuencias que tendría, en uno
de los vídeos de David Heath, al que conocimos en el Congreso ACCE de Cádiz, se
ve que rodea la mitad del filtro exteriormente con una malla de acero
inoxidable. El aspecto es bastante feo, y en realidad esa malla se expone a ser
arrancada de su sitio igual que la tapa de goma negra.
-Lo que he hecho, modificando un poco su idea, es fabricar una especie de "dedal" (como uno
de costura) con una malla de acero inoxidable fina, de 0,4 mm de paso (creo). Es
bastante flexible y se corta bien con unas tijeras normales. La longitud es de
unos 3-4 cm, y el diámetro es el del interior de filtro, un poco
sobredimensionado para que entre a presión (girándolo un poco entra mejor)
Para cerrarlo por arriba se hacen unos cortes paralelos al eje del dedal y se
doblan ordenadamente. DETAIL 2:
Emergency filter.
- At the beginning of the cleaning of the first elaboration it is observed that
the black circular rubber lid that closes the filter (necessary to access its
interior and clean it well) had separated from the filter ... It should have
happened right at the end of the boiling ( see point 7.03.42), an accident that
would be quite delicate to handle if it happens halfway through cooking, since
the pump inevitably stops, you have to empty the boiling wort, clean the filter
and red ball valve, ... it's better not to think about it!
-To avoid the disastrous consequences that would have, in one of the videos of
David Heath, which we met at the ACCE Congress in Cadiz, it is seen that
surrounds half the filter externally with a stainless steel mesh. The appearance
is quite ugly, and in fact that mesh is exposed to be torn out of place as the
black rubber cover.
-What I have done, modifying your idea a bit, is to make a cylinder with a fine
stainless steel mesh, 0.4 mm pitch (I think). It is quite flexible and is cut
well with normal scissors. The length is about 3-4 cm, and the diameter is the
inside of the filter, a bit oversized so that it enters under pressure (turning
it a bit easier to put it) To close it from above, cuts are made parallel to the
cylinder axis and they are folded neatly. |
7.04.02.2
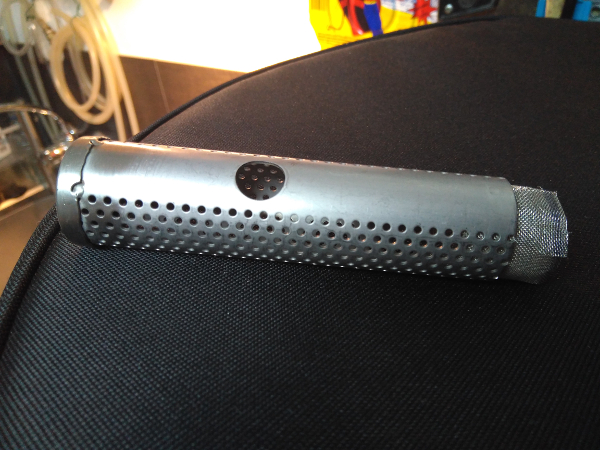
-El dedal de
inox se va introduciendo en el filtro...
-The stainless steel cylinder is introduced into the filter ... |
7.04.02.3
-...y una vez
dentro, se recoloca la goma negra.
-...and once inside, the black rubber is repositioned. |
7.04.02.4
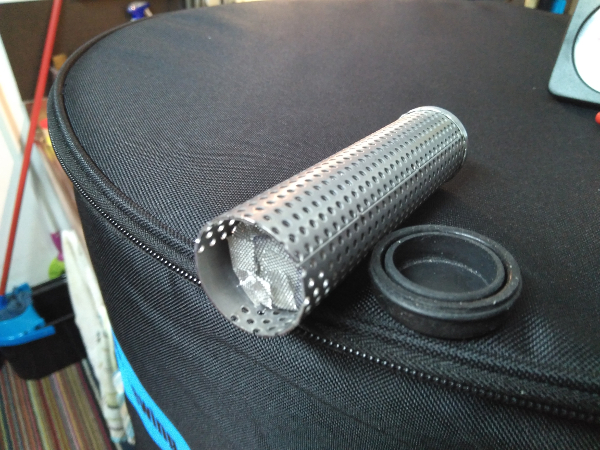
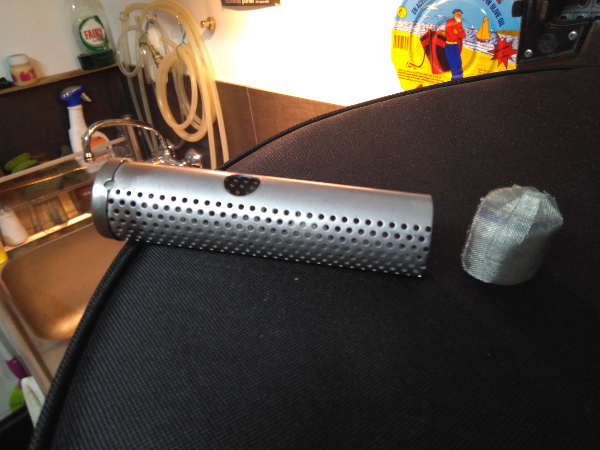
-Obsérvese qué sucede si salta la tapa de goma negra: el dedal de
inoxidable sigue filtrando dentro del filtro, y a la bomba no llegará ningún residuo.
-Tentado estoy de no poner la tapa y dejarlo sin ella, como se ve en la foto,
quizás haciéndolo más largo y colocándolo enrasado con el final del filtro.
-Observe what happens if the black rubber cap jumps: the
stainless cylinder continues to leak into the filter, and no residue will reach
the pump.
-I think you could not put the lid and leave it without it, as seen in the
photo, perhaps making it longer and placing it flush with the end of the filter.
(Volver arriba) |
7.04.03
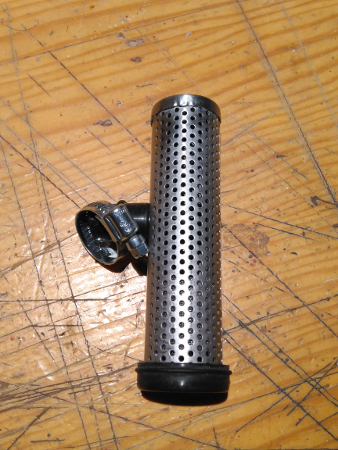 DETALLE 3: Abrazadera en la conexión del filtro.
-También es David Heath quien recomienda que se ponga esa
abrazadera... He buscado una de 16-22 mm y la pondré, no es muy fácil de llegar
a ella estando en su sitio, hace falta un destornillador largo, y se recomienda
engrasar el tornillo y la cremallera para que deslice OK (un poco de aceite de
oliva irá bien, y desaparecerá sin mayores complicaciones)
NOTA: ya lo he probado una vez, y no cuesta tanto. Se pone la abrazadera justo
encima del resalte que lleva el tubo del filtro, se desliza en su sitio,
procurando que el tornillo mire hacia arriba, y se aprieta. No hace falta
pasarse, enseguida se ve que queda bien firme.
DETAIL 3: Clamp on the filter connection.
-It is also David Heath who recommends that you put that clamp ... I have looked
for a 16-22 mm and I will put it, it is not very easy to get to it when it is in
place, a long screwdriver is needed, and it is recommended to grease the screw
and the zipper to slide OK (a little olive oil will go well, and it will
disappear without major complications)
NOTE: I have already tried it once, and it does not cost so much. The clamp is
placed just above the projection that carries the filter tube, slides in place,
making sure that the screw faces up, and tightens. No need to squeeze a lot, you
can see that it is firm.
(Volver arriba) |
7.04.04.1
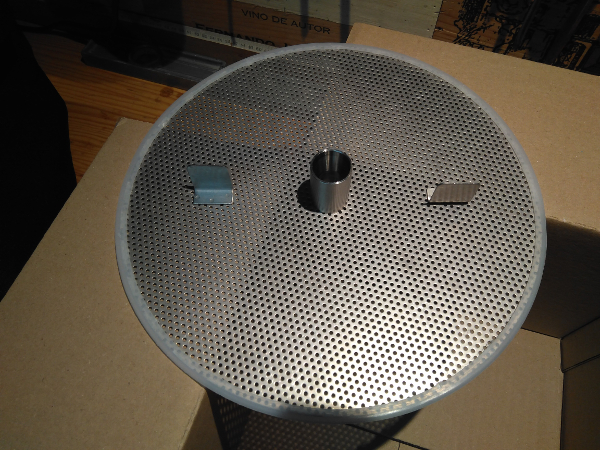 DETALLE 4: Filtro en el rebosadero.
-En cualquier momento del proceso de recirculado puede colarse
sobre la tapa perforada superior alguna cosa que no queramos que cuele por el
rebosadero central, ya que va a parar directamente al fondo y luego a la
bomba...
DETAIL 4: Filter in the overflow.
-At any time of the recirculation process, something that we do not want to flow
through the central overflow can be sneaked on the upper perforated lid, since
it goes directly to the bottom and then to the pump ... |
7.04.04.2
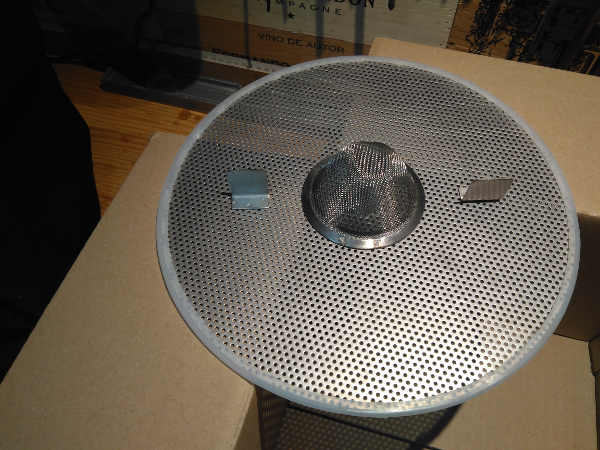
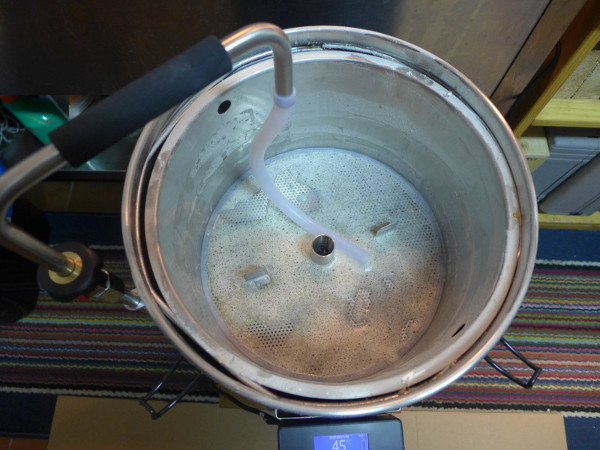
-Para evitarlo, y siguiendo ahora una de las varias ideas
aportadas por Stepenwolf y Raulito (¡qué pasada de presentación en Cádiz del estilo del
concurso del año próximo!), corté el mango y el apoyo de un colador de inox que
rondaba por la cocina de casa, y se usa tal como se ve en la foto (obviamente,
la pieza del rebosadero está en su sitio...). Sencillo y eficaz, es una ayuda
más al filtrado, siempre conveniente.
To avoid this, I cut the handle and the support of a
stainless steel sieve that went around the kitchen of the house, and it is used
as it is seen in the photo (obviously, the piece of the overflow is in its place
...). Simple and effective, it is one more aid to filtering, always convenient.
(Volver arriba) |
7.04.05
 DETALLE 5: Remover durante el macerado.
-Dadas las recomendaciones leídas en el Foro ACCE
(Raulito, p. ej.), decidí remover
el grano un par de veces durante el macerado. Sobre ello querría hacer las
siguientes consideraciones:
1.-Apagar la bomba (obvio)
2.-Subir unos milímetros la tapa superior (hay que cogerla con algo, quema
demasiado) y retirar la pieza superior del rebosadero (si no se quita pronto,
puede acabar por rodar y caer en el grano... lo digo por propia experiencia)
3.-Estirar el tubo extensible superior del rebosadero y poner el tubo-tapón para
que no se cuele nada. (Pienso que hay que extenderlo bastante, ya que entre las
paredes de los tubos parece que pueda colarse algo)
4.-Acabar de sacar la tapa perforada.
5.-Remover bien el grano.
6.-Recolocar todo y seguir con la recirculación del macerado.
DETAIL 5: Stir during maceration.
-To increase the efficiency of the mash, I decided to remove the grain a couple
of times during the mash. On this I would like to make the following
considerations:
1.-Turn off the pump (obvious)
2.-Climbing a few millimeters the top cover (you have to take it with something,
burn too much) and remove the top piece of the overflow (if it is not removed
soon, may end up rolling and fall into the grain ... I say this from my own
experience )
3.-Stretch the upper extendable tube of the overflow and put the tube-stopper so
that nothing is strained. (I think you have to extend it a lot, since between
the walls of the tubes it seems that something can creep in)
4.-Finish removing the perforated lid.
5.-Remove the grain well.
6.-Reposition everything and continue with the recirculation of the mash.
(Volver arriba) |
|
7.04.06.1
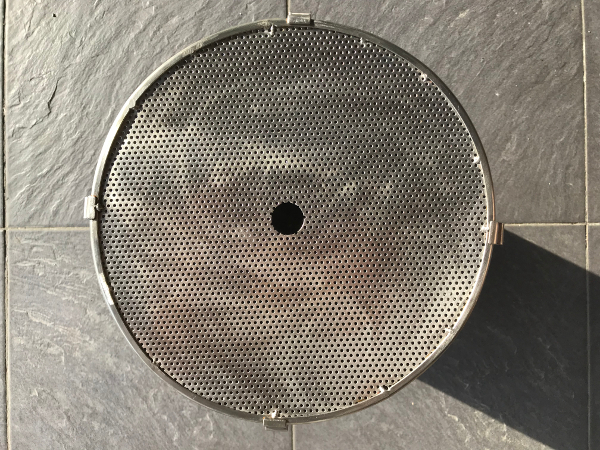 DETALLE 6: El problema de la placa inferior
-Desde el primer momento, la colocación de la placa inferior se
convirtió en un tema muy incómodo, tardando bastante tiempo en conseguir su
posición correcta con la junta de silicona en su sitio.
-Leyendo foros específicos de la Grainfather en la Red, vi que el
tema no era cosa mía estrictamente, y mucha gente se quejaba de lo mismo.
-Después de tres elaboraciones con la G.F. me di cuenta que en
realidad el que la placa inferior se pudiese desmontar no era necesario para
nada.
-La decisión adoptada ha sido fijarla en su posición correcta
para siempre mediante una docena de pequeños puntos de soldadura tal como se ve
en la foto, tomada en perpendicular al fondo.
-Al quedar perfectamente ajustada la placa a la cesta, la junta
de silicona ya no es necesaria, desapareciendo de paso un nido de suciedad que
hay que limpiar con cuidado, normalmente cepillándolo por dentro.
-La placa y la cesta se han convertido en una sola pieza, cuya
limpieza se integra de manera natural en el ciclo de lavado al final de cada
elaboración.
DETAIL 6: The problem with the bottom plate
-From the first moment, the placement of the lower plate became a very
uncomfortable subject, taking a long time to get its correct position with the
silicone gasket in place.
- Reading specific forums of the Grainfather on the Net, I saw that the issue
was not strictly mine, and many people complained about it.
-After three elaborations with the G.F. I saw that actually the fact that the
lower plate could be dismantled was not necessary at all.
-The decision has been to fix it in its correct position forever by means of a
dozen small welding points as seen in the photo, taken perpendicular to the
bottom.
-When the plate is perfectly adjusted to the basket, the silicone gasket is no
longer necessary, disappearing a dirt nest that must be cleaned carefully,
usually by brushing it inside.
-The plate and the basket have been converted into a single piece, whose
cleaning is integrated naturally in the washing cycle at the end of each
elaboration. |
7.04.06.2
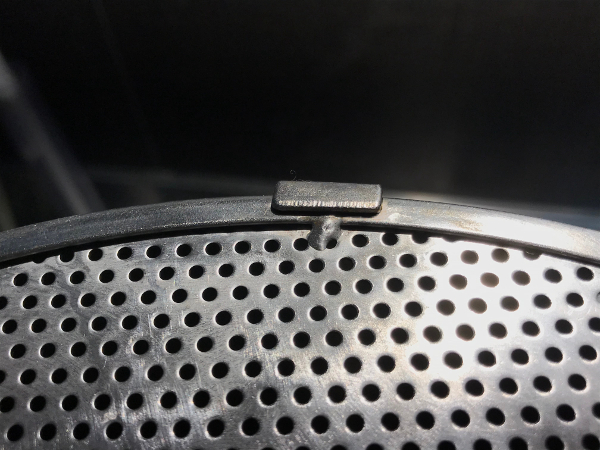
-Los puntos de soldadura de inox son muy pequeños, y se han puesto en total una
docena.
-The stainless steel welding points are very small, and a dozen have been
added in total. |
7.04.06.3

-Falta simplemente limpiar bien cada soldadura y pulirla un poco para eliminar
posibles rugosidades.
-Simply clean each weld and polish it a little to eliminate
possible roughness.
(Volver arriba) |
|
7.04.07.1
 DETALLE 7: ¿Un atasco? Una posible
solución...
DETALLE 7: ¿Un atasco? Una posible
solución...
-Alguna vez (normalmente tras el hervido y empezando a pasar el
mosto enfriado al fermentador) puede suceder que la
bomba se bloquee: un atasco producido por residuos sólidos que (a) no deberían
estar allí o (b) son lúpulos que no se han puesto en bolsa o en spider porque se
prefiere el contacto directo...
-Antes de ponerse a desmontar la llave roja, o a rascar el filtro
(cuidado con la tapa...) o a vaciar el mosto en otro recipiente, hay que probar
otra cosa muy simple y que puede dar un resultado excelente...
DETAIL 7: A clogging? A possible solution...
-Sometimes (usually after boiling and starting to pass the cooled wort to the
fermenter) it can happen that the pump is blocked: a jam produced by solid waste
that (a) should not be there or (b) are hops that have not been placed in a bag
or spider because direct contact is preferred ...
-Before starting to disassemble the red key, or to scratch the filter (be
careful with the lid ...) or to empty the must into another container, you have
to try something else very simple and that can give an excellent result ...
|
7.04.07.2
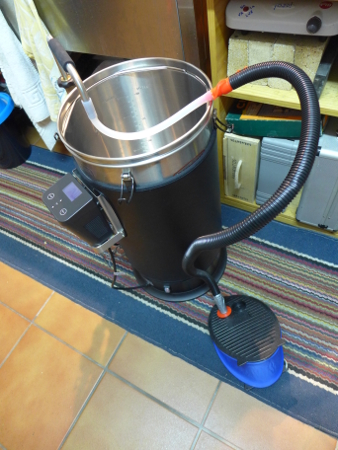
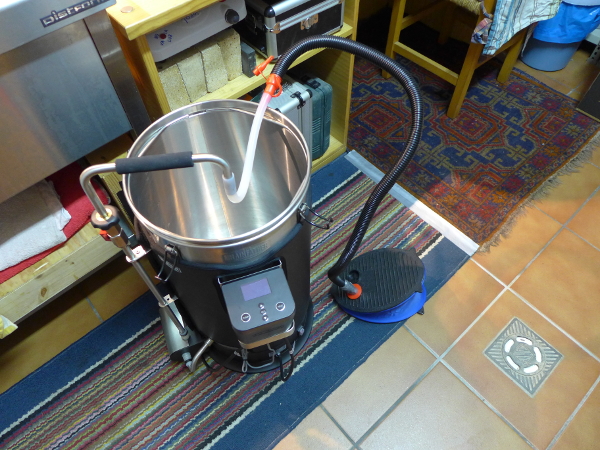
-Es tan sencillo como (con la bomba apagada y la llave roja
abierta del todo) conectar al tubo de descarga cualquier hinchador de bicicleta,
colchoneta de playa, juguete de niño,... y bombear aire varias veces. Lo normal
es que el atasco desaparezca.
-Obviamente, según el origen del atasco puede volverse a producir
o no, pero de momento hemos salvado la situación muy fácilmente.
-It is as simple as (with the pump off and the red key open at
all) connect to the discharge tube any bicycle, beach mat, child's toy, pump...
and pump air several times. The normal thing is that the clogging disappears.
-Obviously, depending on the origin of the cogging, it can happen again or not,
but for the moment we have saved the situation very easily.
(Volver arriba) |
|
7.04.08.1
 DETALLE 8: Una paleta extensible
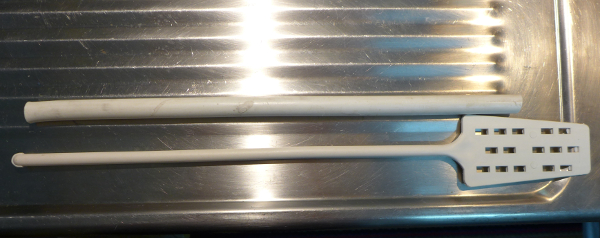
-La profundidad de la G.F. ha dejado corta mi paleta de siempre,
por lo que me compré una de inox de 60 cm.
-Pero si alguna vez he querido rascar el fondo de la olla durande
el hervido para evitar que se queme el mosto allí pegado, me ha parecido que se
hacían rayas de manera un tanto excesiva.
-Así que he buscado un tubo de plástico resistente al calor, un
trozo de lo que usé en la calefacción de casa, de manera que se pueda alargar la
anterior paleta.
DETAIL 8: An extendable palette
-The depth of the G.F. has left my palette short, so I bought a stainless steel
60 cm.
-But if I've ever wanted to scratch the bottom of the pot during the boiling to
avoid burning the wort there, it seemed to me that they were scratching a bit
too much.
-So I've looked for a heat-resistant plastic tube, a piece of what I used in the
home heating, so that the previous palette can be lengthened.
|
7.04.08.2
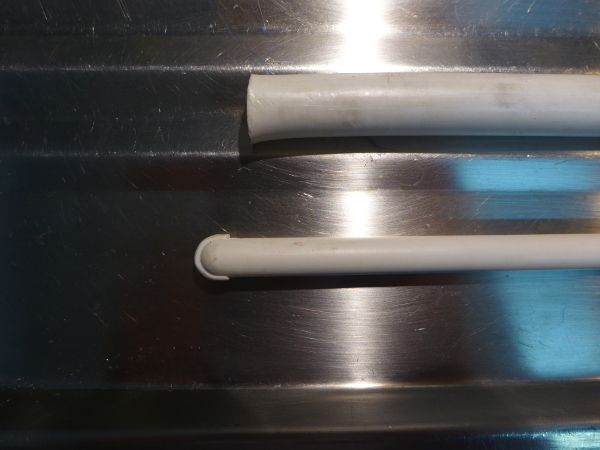
-La clave del asunto es que el resalte del extremo de la paleta
encaje un poco a presión en el interior del tubo de plástico (16 mm de diámetro
tenía este)
-The key of the matter is that the protrusion of the palette
end fits a little under pressure inside the plastic tube (16 mm in diameter had
this) |
7.04.08.3
-Y así se puede tener una paleta tan larga o corta como se
quiera, con la ventaja añadida de que en la posición corta gana bastante
rigidez, cosa que ella sola no tiene.
-And so you can have a palette as long or short as you like,
with the added advantage that in the short position you gain enough rigidity,
which she does not have alone.
(Volver arriba) |
|
|